|
|
|
|
|
Smileycons
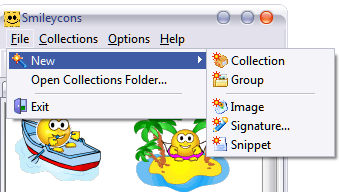
6.0.1 Tutorials - Creating Your Own Packs Are you the creative type? Did you know. if you're a registered Smileycons user, you can create and use your own original packs in Smileycons? It's easy to do! If you're not using the registered version of Smileycons, click here to see the differences between the free version of Smileycons and the registered version. If you're good with graphics programs and animation you can create your own original animations (we don't provide animation or graphics tutorials - sorry!) and create an original pack. If you're not quite that creative, you can use images you already have on your hard drive, or you can simply drag them into your own packs from the Web (please do respect other people's copyrights though!). Do not try to drag an image into the pack that is hyperlinked or it will not work. You can tell if an image is hyperlinked by hovering over the image and seeing if it leads to another image or page. There are many sites on the Web that offer free graphics and animations for personal use. Just do a search for "free animations" or "free graphics" and see what you can find. IMPORTANT: If you let Windows close a program, it does not save the latest changes/updates. It is very important to choose File, Exit (not close) in the Smileycons program after you make changes such as additional packs, images, etc. Do NOT click the red x to close.. you must choose File, Exit, as the red x simply minimizes. Here's a couple of tips on creating your own Smileycons packs - and a couple of basic things you need to know. 1. Before you can do anything you need to create a pack and give it a name. So open Smileycons and click "File" and choose "Collection" from the drop-down menu.
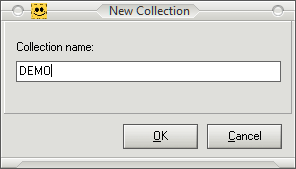
2. In the "New Collection" dialog, Give it a name. You can do better than we did! We called ours "DEMO" not too original, huh?
3. But wait! Before you can start adding images, you need to create at least one GROUP. After you click the OK button (after naming your collection) you will be given a chance to name the first GROUP in your collection. You can have as many groups in your collection as you want. But you must have at least one before you can start adding images.
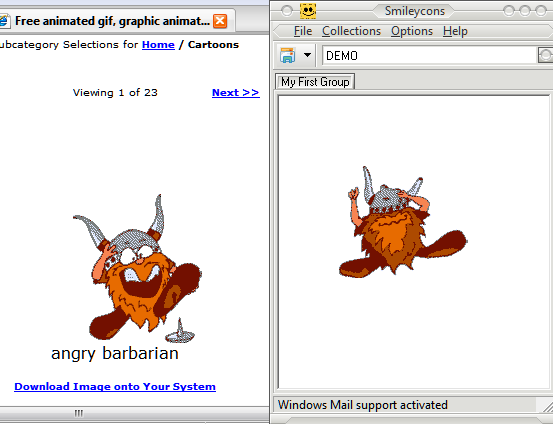
4. Again, we weren't too creative with our Group Name, you can do better! We called our group, "My First Group". But, you get the idea. Once you click "OK" after naming your group, the fun can begin. 5. We searched for (and found!) a site that offered some cool animated gifs for personal use. We're a company, but you're not, so anything you use is for your personal use. What we did here was to drag the image we wanted from the Web site (on the left) into the our new Group (My First Group) in our new "DEMO" collection. We placed our cursor over the angry barbarian, pressed and held down our left mouse button until the image was over the Smileycons program with our new group showing. Then we released our mouse button to drop him in there. See? It's easy.
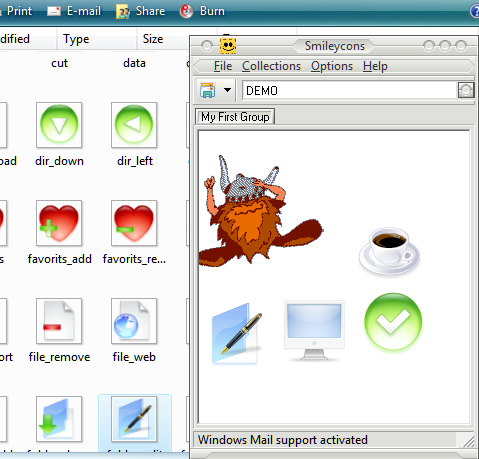
You can add images from any folder on your hard drive just as easily too! Below is a screen capture of a folder we had on one of our hard drives with some images in it that we wanted to use in Smileycons. Using the same method as above, we dragged the images into the Smileycons program - into our new group. Do you see the cup of coffee there? Doesn't it look good? Wouldn't that look good in a morning email? Sort of wakes you up doesn't it?
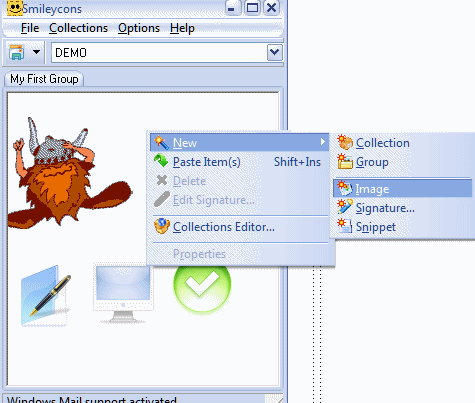
And yes, there's another way to do it too. You can right-click anywhere in a blank area in the Smileycons group and choose New --->Image. See? Then you can browse to any image on your hard drive and add it that way. And if you looked at the image below, you can see that you can also create and add a new Signature to your group or a new text "Snippet" to your new group. Text Snippets, by the way, are little snippets of text, for example, famous quotations you can save to a group in your collection and just click to add them to your email messages just like you do with images. Pretty cool, huh? And if you want to add another group, just select "New" "Group" and give it a name. Groups are great for keeping your collections organized. So use groups to keep like items together. For instance you might have one group called Web Animations, one called "My Signatures" and one called "My Quotes". Get it? Thought so!
5. Oh, Yeah! One More Thing. You can use your own packs in your email without doing anything else. Just create your pack and Smileycons will automatically save it for you. But, if you want to use your own collections on Web mail like Yahoo, Google, or Hotmail/MSN, or you want to use them on your blog or on message boards, you'll need to mirror your collection, group(s) and images on a Web server. The reason is the way the web works. You can't use images on your hard drive on the Web. They must be located and called from a web server. Many places offer free or low-cost image hosting. Some basic knowledge of HTML and web pages is very helpful too. But if you want to use your own creations in your email, Smileycons makes it easy for you. Remember, If you let Windows close a program, it does not save the latest changes/updates. It is very important to choose File, Exit (not close) in the Smileycons program after you make changes such as additional packs, images, etc. Do NOT click the red x to close.. you must choose File, Exit, as the red x simply minimizes. We cannot give individual support on this; it does require at least some basic principles and we cover them as thoroughly as we can here. |
|
Smileycons is compatible with Windows 98, Windows 98 SE, Windows NT, Windows ME, Windows 2000, Windows XP, Windows Vista, and Windows 7. Smileycons is copyright ©2004-2009 by Cloudeight Internet LLC (all rights reserved). Smileycons® is a registered trademark of Cloudeight Internet LLC. Home | Help | Tutorials | Download | Register |
|